Making a Pie Crust

For novice bakers, a light, flaky pie crust can seem like an elusive grail, but following a few simple principles can make this goal easier to achieve. First rule: keep the ingredients cold —doing so not only makes the dough easier to handle; it helps ensure a toothsome crust. Cold, hardened butter disperses into the flour more evenly, promoting the creation of tiny pockets of steam during baking, which, in turn, create layers in the crust. It's not enough to start with chilled butter, though; you have to keep it cold as you work the dough. Using ice-cold water and working quickly on a cool marble work surface help accomplish this; so does chilling the dough once it's made. For full recipes, see our collection of Thanksgiving Pies and Desserts »

1. Mix 3 cups flour and 2 tsp. fine salt into a mound on a marble surface; add 14 tbsp. chilled, cubed butter.
2. Rub and pinch butter into flour with fingers to coat butter pieces evenly, forming small, pea-size balls.
3. Create a well in the center of the butter¿flour mixture; add 1/2 cup ice water; mix together with hands.
Making a Pie Crust
Making a Pie Crust

For novice bakers, a light, flaky pie crust can seem like an elusive grail, but following a few simple principles can make this goal easier to achieve. First and foremost: cold ingredients–especially cold, hardened butter– are the secret to a flaky, toothsome crust. See the step-by-step guide to perfect pie crusts »
See 8 Great Pie Tips »

5. Pull away walnut-size pieces of dough and smear them with the heel of your hand (this technique, called fraisage, helps produce flaky layers).
6. Form flattened pieces into a ball. Halve dough ball, form into 2 disks, and wrap separately in plastic wrap. Refrigerate for 2 hours.
7. Roll a floured rolling pin from the center of one of the dough pieces to the edge, rotating the dough, little by little, until circle is 1/8" thick.
8. Carefully wrap dough around the rolling pin and lift pin over the edge of the pie pan. Gently unroll dough over the pan.
9. Add filling of choice; roll out second dough piece. Brush pie rim with water; unroll second dough sheet over pie as shown in step 8.
10. Press down on rim lightly to adhere top crust to bottom one; trim off excess dough with a paring knife. Fold edges under to form a thick edge.
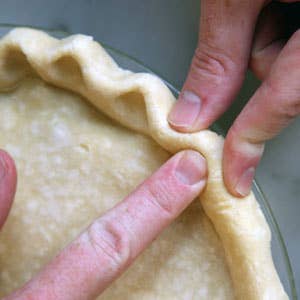
11. Crimp edge of crust by placing two fingers on the crust's outside rim while placing one finger on the inside and pressing outward to form a V.
12. Form dough scraps into a ball and roll it out; cut out decorative shapes. Lightly brush pie top with water; adhere decorative shapes to top.
ANDRÉ BARANOWSKI
Techniques

Making a Pie Crust

For novice bakers, a light, flaky pie crust can seem like an elusive grail, but following a few simple principles can make this goal easier to achieve. First rule: keep the ingredients cold —doing so not only makes the dough easier to handle; it helps ensure a toothsome crust. Cold, hardened butter disperses into the flour more evenly, promoting the creation of tiny pockets of steam during baking, which, in turn, create layers in the crust. It's not enough to start with chilled butter, though; you have to keep it cold as you work the dough. Using ice-cold water and working quickly on a cool marble work surface help accomplish this; so does chilling the dough once it's made. For full recipes, see our collection of Thanksgiving Pies and Desserts »

1. Mix 3 cups flour and 2 tsp. fine salt into a mound on a marble surface; add 14 tbsp. chilled, cubed butter.
2. Rub and pinch butter into flour with fingers to coat butter pieces evenly, forming small, pea-size balls.
3. Create a well in the center of the butter¿flour mixture; add 1/2 cup ice water; mix together with hands.
Making a Pie Crust
Making a Pie Crust

For novice bakers, a light, flaky pie crust can seem like an elusive grail, but following a few simple principles can make this goal easier to achieve. First and foremost: cold ingredients–especially cold, hardened butter– are the secret to a flaky, toothsome crust. See the step-by-step guide to perfect pie crusts »
See 8 Great Pie Tips »

5. Pull away walnut-size pieces of dough and smear them with the heel of your hand (this technique, called fraisage, helps produce flaky layers).
6. Form flattened pieces into a ball. Halve dough ball, form into 2 disks, and wrap separately in plastic wrap. Refrigerate for 2 hours.
7. Roll a floured rolling pin from the center of one of the dough pieces to the edge, rotating the dough, little by little, until circle is 1/8" thick.
8. Carefully wrap dough around the rolling pin and lift pin over the edge of the pie pan. Gently unroll dough over the pan.
9. Add filling of choice; roll out second dough piece. Brush pie rim with water; unroll second dough sheet over pie as shown in step 8.
10. Press down on rim lightly to adhere top crust to bottom one; trim off excess dough with a paring knife. Fold edges under to form a thick edge.
11. Crimp edge of crust by placing two fingers on the crust's outside rim while placing one finger on the inside and pressing outward to form a V.
12. Form dough scraps into a ball and roll it out; cut out decorative shapes. Lightly brush pie top with water; adhere decorative shapes to top.

Continue to Next Story

Want more SAVEUR?

Get our favorite recipes, stories, and more delivered to your inbox.