
Make That Peak-Season Winter Citrus Last All Year Long
Master preserver Camilla Wynne’s simple and riffable orange marmalade recipe.
While January might be quite dour here in Toronto, the fact that these shorter days herald citrus season eclipses all the gloom. Brilliant jars of homemade orange marmalade catching the sun can be better at fighting the winter blues than even the most powerful SAD lamp; the bright and candied citrus smell that permeates your house doesn’t hurt either. While there are many an orange marmalade recipe, this one—the whole fruit method—is certainly the easiest, and the one for you if you love the idea of lots of delicious peel, bound together in jelly.
Seville oranges’ rich flavor and high pectin content make them the classic marmalade fruit, but just about any citrus can be turned into an exquisite marmalade. Choose your favorite fruit, or use a mix—just skip the limes, which tend to turn into leathery little footballs when boiled. Once you master this method, the fun begins and you can make the recipe entirely your own: feel free to experiment with flavorings like herbs, spices, and alcohol, or even add-ins like cocoa nibs. Here’s how to get started:
Day 1: Simmer the Citrus
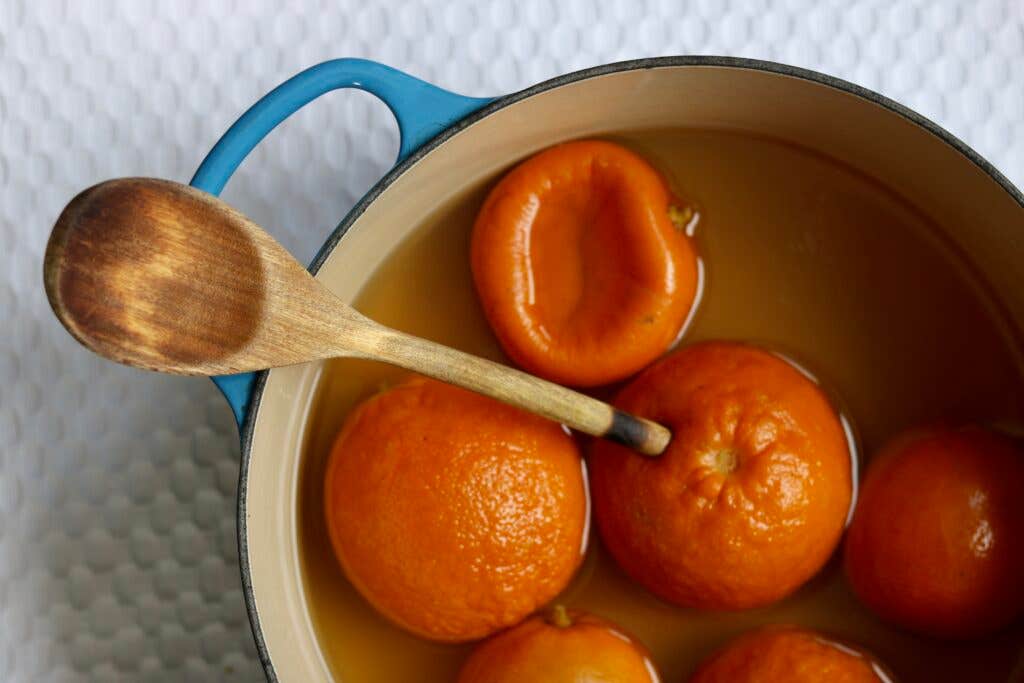

Start with about a kilo (2¼ pounds) of whole fresh citrus fruit—a little less is fine, but with a larger batch, it can be difficult to judge the pectin’s set. Scrub the fruit well in hot water, then place them in a pot wide enough to hold them in a single layer. Add enough cool water so that they float merrily, then cover and bring to a boil over high heat. Turn the heat down to maintain a gentle simmer, then cook until the fruit is very soft, one to two hours. Some of the fruit may collapse, some may split—it’s all good. (Tradition dictates that they should be soft enough to easily pierce with the handle of a wooden spoon.) Remove from the heat and set aside to cool at room temperature for at least 8 and up to 24 hours.
Day 2: Process and Macerate


Drain the cooled fruit, discarding the cooking liquid, then slice each piece in half at the waist. Place a food mill or a fine sieve over a large bowl, then use your hands or a spoon to scoop the insides into it, setting the peels aside. Pass the fruit through the mill to separate the seeds and pithy membranes from the juice and tender flesh; discard the former.
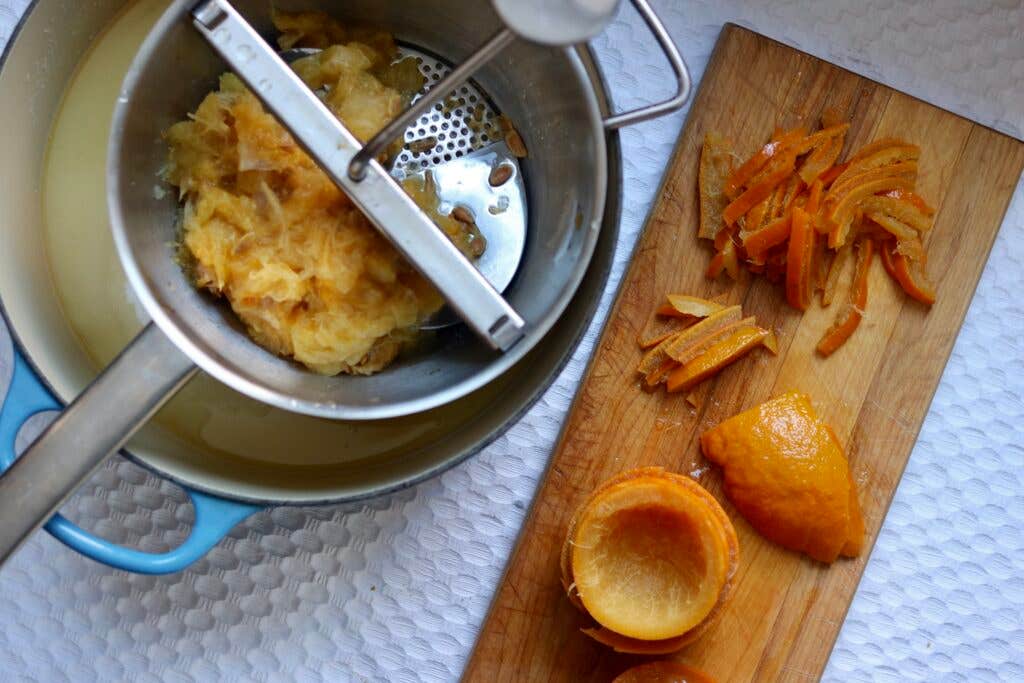

Letting the citrus cool overnight means not only will it be cool enough to handle; also, any undercooked bits should have continued cooking in the residual heat. Still, if you see any white (aka undercooked) bits of peel, cut away and discard them, as they’ll tend to turn hard during the next stage of cooking.
Now it’s time to shred the reserved peel, which you can cut as thick or thin as you like—you can even use a small cookie cutter to punch the peels into pretty shapes! I prefer to slice it into ¼-inch-thick strips. Once the peel is cut, add it to the bowl of reserved juice and pulp, then add an equal amount of sugar to starting fruit by weight. In other words if you began with one kilo of whole fruit, then add one kilo (about five cups) of sugar. This may seem like a lot of sugar, but is in fact about half of what you might find in a traditional orange marmalade recipe; a lot of sugar is necessary to balance the acidity and bitterness of whole citrus fruit. Then, for every kilo of starting fruit, stir in 100 grams (about ½ cup) of fresh lemon juice. This helps to activate the natural pectin in the skins—essential for making the marmalade gel. Stir the mixture well, then cover and refrigerate for at least 8 hours and up to 7 days. (You can cook it immediately, but an overnight rest will help the sugar to dissolve and penetrate the peel.)
Day 3: Cook and Can the Marmalade

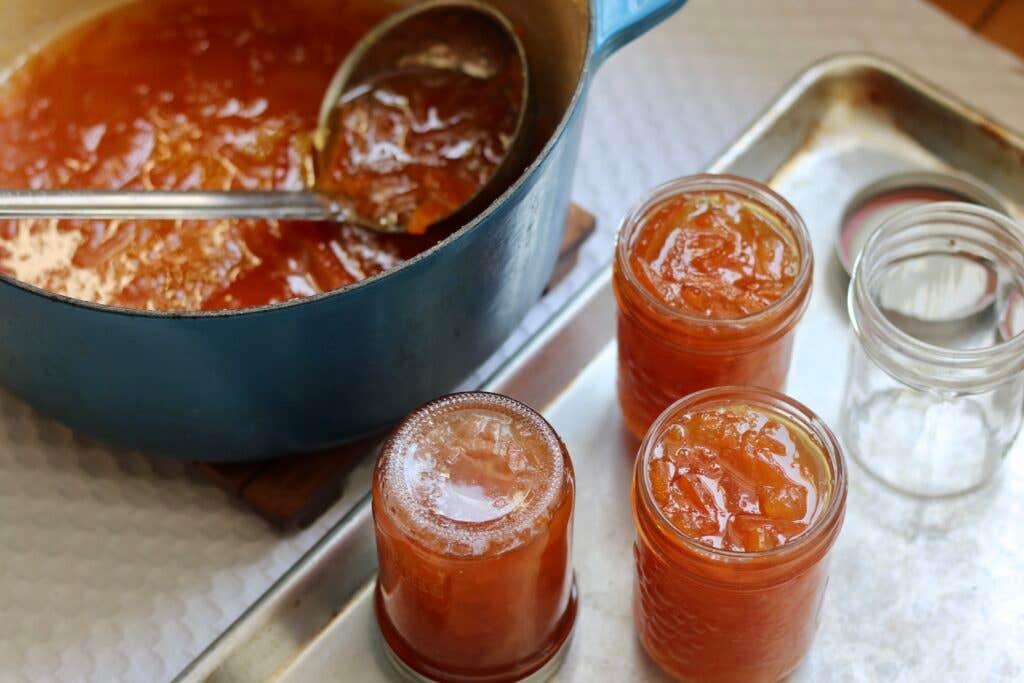
Prepare clean jars by placing them upside down on a large rimmed baking sheet in a 250°F oven for at least 20 minutes. A one-kilo batch should fill five to six half-pint jars, but I like to put in a few extra just in case. Have new snap lids close at hand, and place a ceramic saucer in the freezer.
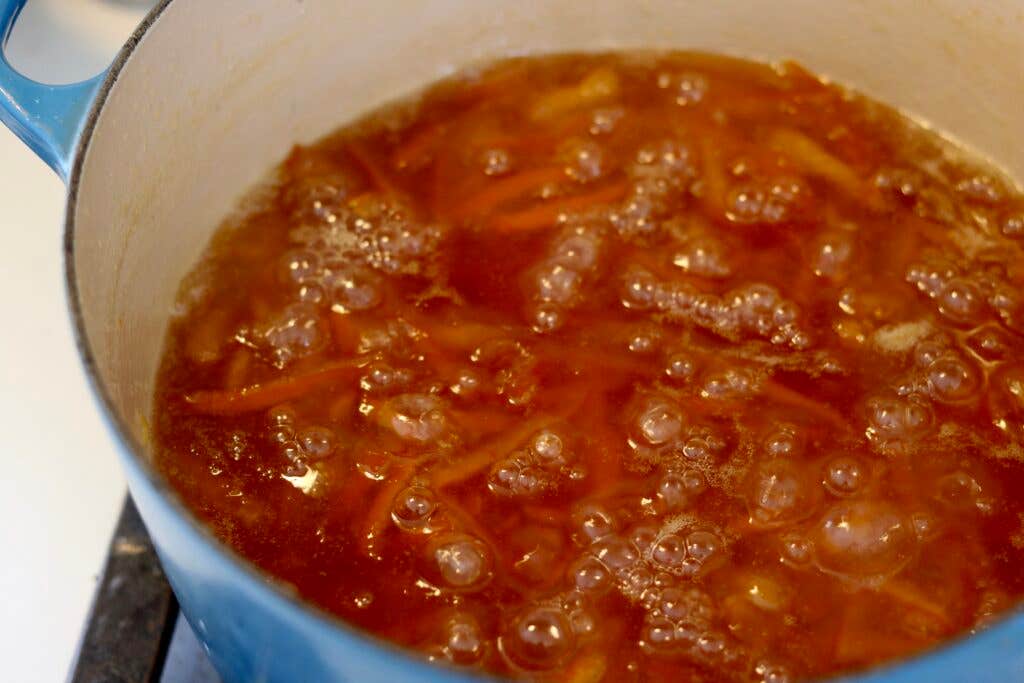
Transfer the marmalade mixture to a wide, non-reactive, heavy-bottomed pot and set over medium-high heat. Bring to a boil, stirring frequently and taking care to scrape the bottom of the pot with a silicone spatula. Observe the bubbles that form along the surface as well as the way the marmalade falls from the spatula when hoisted aloft. When ready, the surface of the marmalade will be glossy; it will form large and rhythmic bubbles; and the mixture should cling to the spatula. To test the set, place a teaspoon of the hot liquid onto the frozen saucer, then immediately return the dish to the freezer for two minutes. Retrieve the dish, then give the dollop a nudge with your fingertip. If the surface wrinkles like a silk shirt on the floor on Sunday morning, it’s ready. Otherwise, continue cooking for a few minutes before trying again. (A one-kilo batch should be properly set after 20 to 30 minutes of cooking.)
Remove the pot from the heat and carefully ladle the marmalade into a large, heat-resistant measuring cup or jug. Pour into hot jars to within ¼- to ⅛-inch of the rim, then use a damp paper towel to clean any drips from the edges. Seal tightly with new snap lids and ring bands, invert the jars for one to two minutes, then turn them upright again; set aside, undisturbed, for 24 hours.
Day 4: Wait...and Eat

The next day, check that the jars have sealed by removing the ring bands and picking them up by the snap lids. Refrigerate any that did not (eat within a year), then label and store the sealed jars in a cool, dark place. Marmalade will keep well for at least two years, getting darker, richer, and thicker with time.
Keep Reading

")


")


Continue to Next Story
