The Best Attachments for Your KitchenAid Mixer Can Make You a Better Cook
With a slew of great add-ons, this countertop workhorse can do even more than mix.

The most-used tools in a cook’s kitchen—whether at home or in a restaurant—are often the ones that are the most versatile. An heirloom cast-iron skillet, a go-to chef’s knife, the tough-as-nails cutting board: these are the tools that do the heavy lifting. For chefs and serious home cooks alike, this list usually includes a quality stand mixer.
For us, the hands-down favorite is the KitchenAid brand mixer, with its sleek, archetypal design, multitude of dazzling colors (including the newly released beetroot), and, most importantly, their extensive list of removable attachments. The best KitchenAid mixer attachments are game-changers for the home cook or baker, allowing you to exponentially improve your culinary offerings. In many cases, these attachments can be purchased for a fraction of the cost of their analog or project-exclusive counterparts, like a food processor or grain mill. Plus, they can get the job done in a fraction of the time. No need for hand-crank pasta rollers here, my friends!
We love how the long list of attachments are all interchangeable regardless of the mixer model you have (with an exception or two if you’re using the KitchenAid Mini). This means that whether you’re a beginner baker, a budget-conscious weekend gourmet, or a semi-pro who needs the top-of-the-line model, all of the attachments will fit the machine that’s currently on your countertop.
And sure, a trusty hand mixer might get the job done for some. They’re easy to use, easy to store, and are absolutely capable of whipping egg whites into a meringue or mixing up a batch of cookie dough. But, when it comes down to it, a KitchenAid stand mixer outfitted with our favorite attachments is unbeatable.
After hours of testing, we have some favorites. Here’s our take on the best KitchenAid mixer attachments.
Our Top Picks
- Best Overall: KitchenAid 3-Piece Pasta Roller & Cutter Set
- Best Value: KitchenAid Fresh Prep Slicer/Shredder Attachment
- Best for the Whole-Grain Aficionado: KitchenAid KGM All Metal Grain Mill Attachment
- Best for the Pasta Lover: KitchenAid Gourmet Pasta Press Attachment
- Best for the Carnivore: KitchenAid KSMMGAQ Metal Food Grinder Attachment
- Best for the Backyard Griller: KitchenAid Attachment Food Grinder Accessory
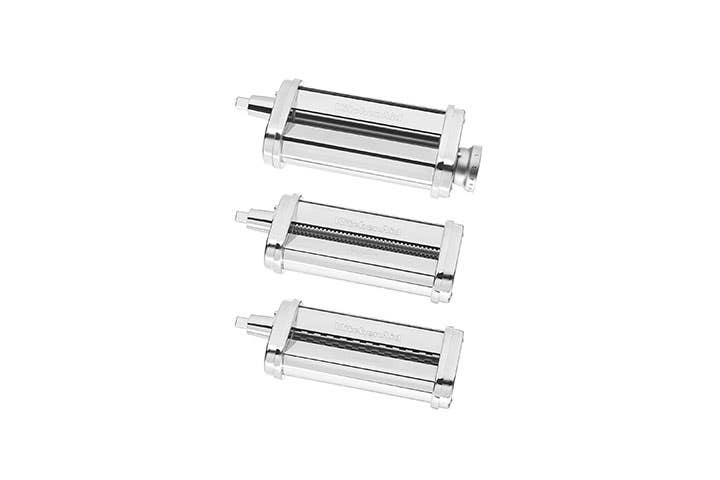
Best Overall: KitchenAid 3-Piece Roller & Cutter Set
Best Overall
Versatility rating: High | Good for: Most fresh pasta/noodle doughs | Material: Stainless steel
Pros
- Easy to use
- 8 different thickness settings
- Cutters included for two popular pasta/noodle shapes
- Stainless steel construction
Cons
- Less of an “artisan feel” compared to a hand-crank machine
Why we chose it: This attachment immediately ups your culinary capability, and the two sizes of cutters allow you to create a near-limitless variety of noodle dishes. It will truly open up a new culinary universe. If I had to pick just one KitchenAid attachment to own, this would be it.
Whether dried or fresh, bronze-die extruded or hand-rolled, various forms of noodles have been sustaining cultures for millennia. They’re the centerpiece of countless dishes in cuisines spanning the globe, and there is a reason for that: they generally require only a few low-cost, readily available ingredients and provide more energy per calorie than almost any other food. Our favorite thing about the KitchenAid 3-Piece Pasta Roller & Cutter set is the immense variety of fresh pasta and noodle dishes you can make.
In less time required for a run to the grocery store, you’ll be able to throw together a batch of dough, roll it out to the thickness you desire, and cut it into perfect noodles. The roller works well for both enriched doughs (like an egg-based Italian pasta) and other less-hydrated doughs, such as fresh ramen.
This roller is quite intuitive. There are eight different thickness levels, ranging from 1 (the thickest) to 8 (almost see-through thin). To use the roller, lob off a hunk of dough, flatten it out between your palm and your countertop, and slowly feed it into the machine. A feature we love is the way this attachment lets you roll the dough at the speed that makes you most comfortable. First timer? Run the machine on the lowest speed setting while you get your bearings. Seasoned pasta-making pro? Let that thing rip (as long as you can keep up with it!).
If you prefer longer noodles, the cutter is for you. It has two settings, one thinner and rounder (think spaghetti or ramen), and the other is wider and flatter (like fettuccine or wide rice noodles). Once you’ve rolled out your dough sheets to your desired thickness and length, remove the roller and replace it with one of the cutters. Simply feed your dough sheets into the cutters and watch them transform right before your eyes. It’s quite mesmerizing.
One thing to note: I recommend to ALWAYS start rolling your dough on the thickest setting. Neglecting to do so will only tear your dough and cost you time. The gluten in the dough needs to be stretched gradually; this is achieved by starting on the thicker setting and thinning the dough incrementally. As someone who has used this machine hundreds of times over the course of my professional cooking career, my advice is to run dough sheets twice on each setting. There’s a reason for this: the first “roll” will give the initial shape and structure to your dough, but you’ll notice it recoil slightly once the machine spits it out. The second “roll” will flatten the dough fully, and bring it to the desired thickness required to continue rolling it. Dough, by nature, will always pull back when you try to stretch it, thanks to the aforementioned gluten. This simple protein—which contributes to the chewy, springy texture of your favorite bagel or slice of pizza—is your friend, and you must treat it as such. Trying to force things will only end up causing a rift between you and your dough, and is something I would advise against at all costs.
One more thing: under absolutely no circumstances should you run these attachments under or submerge them in water. These machines, while constructed in Italy using stainless steel, can be prone to rust and breakdown if the internal mechanisms get wet. Fortunately, though, you’ll receive a nifty brush in the box, which is used for removing bits of flour and crusted-on dough. This should be all you need to keep your attachments looking spiffy and capable of fulfilling your carb-filled dreams for years to come.
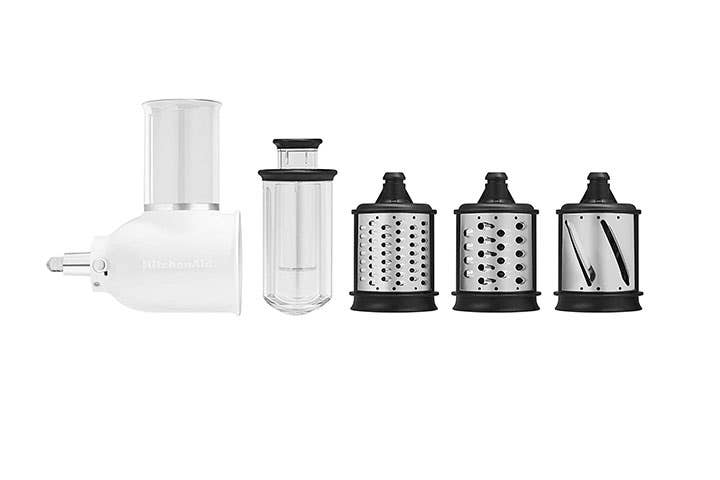
Best Value: KitchenAid Fresh Prep Slicer/Shredder Attachment
Best Value
Versatility rating: High | Good for: Most vegetables and cheeses | Material: Plastic, stainless steel
Pros
- Great for tedious or large-batch projects
- 3 size settings capable of shredding and slicing
- Easy to use
- Relatively easy to clean: blades are dishwasher safe
Cons
- Lightweight, semi-plastic construction
- Tendency for some splatter/mess depending on what you’re processing
Why we chose it: It takes the busy-work out of the largest variety of ingredients.
This attachment provides the most opportunities for everyday use and has the potential to save you the most time (especially if you’re a meal-prepper or someone who often cooks for a crowd). As one of KitchenAid’s more budget-friendly attachments, it can make a large impact on your kitchen prep without making too large of an impact on your wallet. My favorite aspect of this attachment is the sheer variety of foods that you can process with it. Pick almost any vegetable—from a starchy potato to a past-its-prime zucchini—and this attachment has you covered. Cheeses, too, can be reshaped by this attachment (even soft ones like fresh mozzarella). It’s guaranteed to be fresher than the processed, pre-shredded stuff at the grocery store.
I found that the small shredder/grater size worked well for harder cheeses and denser veggies (think Parmesan or carrots), and the larger shredder worked best on softer cheeses and their softer vegetable counterparts (like queso fresco or cabbage). If you’re someone who isn’t quite confident in their knife skills but needs a bunch of cucumbers sliced for a batch of pickles, this add-on is for you.
Things to note about this attachment deal more with its construction and cleaning. It’s made of plastic and stainless steel, so you’ll always want to be aware not to force it too hard when using it. The blades are sharp, but over time like anything else they’ll dull a bit. This shouldn't be a concern unless you’re preparing daily batches of coleslaw, but it’s something to look out for. Additionally, only the blades are dishwasher-safe, and they’re recommended only to be cleaned on the top shelf of your dishwasher. As for cleaning the plastic housing, some dish soap, warm water, and a little time on the dish rack will suffice. Just be aware if you’re shredding things that tend to stain—like beets or carrots—because unless you have a bowl with both high and wide sides to catch your processed veggies or cheeses, there is a potential for some spillage and dribbling juice. Overall, though, this is a very helpful tool to employ during your next kitchen escapade.
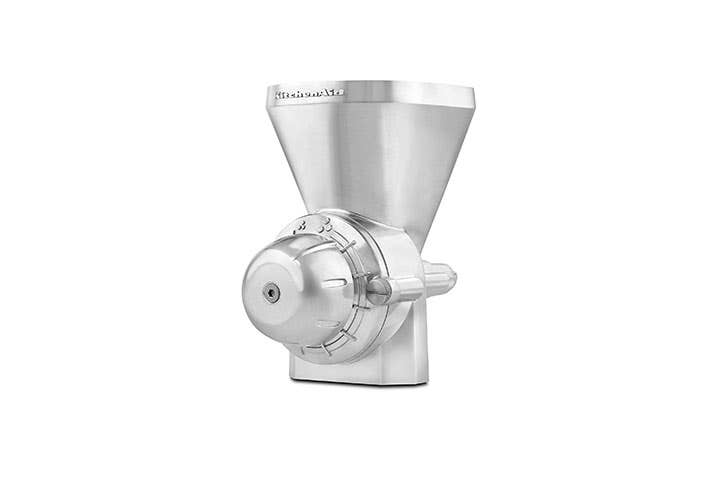
Best for the Whole-Grain Aficionado: KitchenAid All Metal Grain Mill Attachment
Best for the Whole Grain Aficionado
Versatility rating: Medium | Good for: All low-moisture whole grains | Material: Stainless steel, cast aluminum
Pros
- Adjustable-size grind, ranging from coarse to fine
- Allows you to retain nutrients you’d lose in many pre-ground flours.
- Capable of handling a variety of low-moisture grains
Cons
- Quite loud
- Better for small-batch grinds, 2 lbs. or less
Why we chose it: It’s a great way to enjoy truly fresh milled grains without sacrificing cupboard or countertop space.
If you’re especially interested in baking, this attachment may pique your interest. As someone who operated a large stone grain mill at a bakery, and has made a loaf of sourdough bread every weekend for the last several years, I tell you with utmost certainty that there is nothing even close to the flavor of freshly-milled whole grains. Many flours that are commercially available have been ground months in advance; as soon as they’re ground, these grains begin to oxidize, and their flavor typically starts to dissipate. After a few months in a warehouse or grocery store, their taste can be a shell of its former self. Other flours, like the AP flour in your cupboard, are more processed.They’re sifted to remove certain bits like the bran or germ. Once these are removed, you’re left with a softer texture, but many of the nutrients are lost. Whole grains, on the other hand, retain these nutrients, so that they can be absorbed by your body instead of being tossed aside. I’m talking about the heavy-hitters, like fiber, B vitamins, vitamin E, and numerous healthy fats. Good stuff, right?
When using the Grain Mill attachment, I noticed a couple of things. First off, this thing is solid! When they say “all-metal”, they mean it. The internal workings are stainless steel and the outer pieces are cast aluminum. Hefty kitchen accessories are always a plus for me, and when you’re milling grains, few materials other than metal suffice. The burrs (the parts that do the grinding) are capable of producing a range of grind sizes to fit your needs, and you can always run the flour through a second time if you’re looking for a super-fine end product.
Fair warning: the attachment is quite loud to operate. Per the instructions, I ran it on the highest speed on a KitchenAid. I ground a pound of Khorasan wheat (an ancient wheat varietal with grains double the size of standard wheat berries) and a pound of good old-fashioned hard red wheat (the kind you’d find in a whole wheat loaf from a bakery). For both varieties, the sound was akin to pulverizing ice cubes in a food processor. Because of this, I would definitely recommend using this attachment during “business hours”, especially if you live in an apartment building. On the finest setting, the mill took about 15 minutes for each pound of wheat. While milling, you’ll notice the motor heating up a bit, so KitchenAid recommends letting the machine rest 45 minutes between milling sessions; at that noise level, you’ll definitely want a little break, too. As far as care and cleaning go, simply loosen the screws on the front and dust off the internal workings (a cleaning brush is provided). A few other housekeeping notes: don’t submerge it in water or get it wet and, most importantly you must only use low-moisture, non-oily grains, e.g. wheat, rice, cornmeal. Nothing wet, and nothing oily must be ground in it. That means no nuts and no coffee beans; use a designated coffee grinder for beans, and a powerful Vitamix for nut butters.
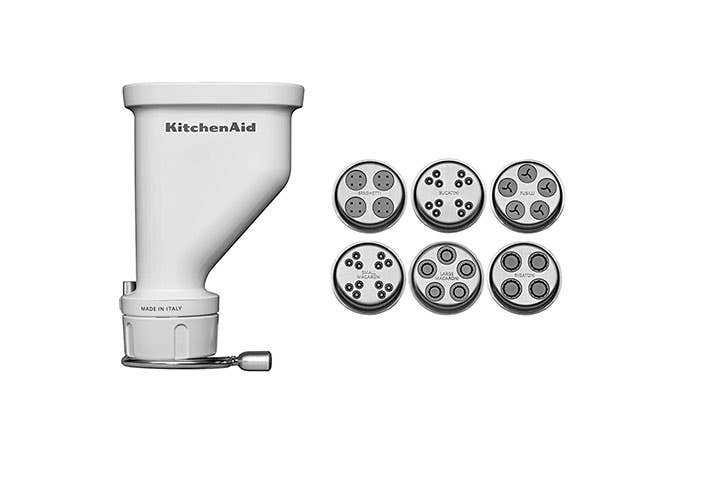
Best for the Pasta Lover: KitchenAid Gourmet Pasta Press
Best for the Pasta Lover
Versatility rating: Medium | Good for: Extruded pasta shapes | Material: Plastic, stainless steel
Pros
- Allows for a variety of extruded shapes
- Relatively easy to use
- Provides an artisan feel vs. buying dried pasta shapes
Cons
- Partial plastic construction
- Works best with 1 dough recipe
- Annoying to clean
Why we chose it: This attachment easily expands your world of homemade fresh pasta into a variety of shapes.
Who doesn’t love pasta? It’s delicious, filling, and generally easy to prepare. There are so many classic shapes out there—over 300—it’s sometimes hard to choose which to cook. There was even a new shape invented in the 2020s, but I digress. Unless you’re lucky enough to have access to a professional pasta extruder (which often start at several thousand dollars), you’d be hard-pressed to find a machine that’s capable of making these shapes fresh in your own home. For less than a couple hundred bucks you’ll be able to make six textured configurations. This attachment will yield both small and large macaroni elbows, rigatoni, fusilli, spaghetti, and bucatini (spaghetti’s superior sauce-adhering cousin). This variety allows you to maximize the outcome of any homemade pasta dish, because you can now tailor the pasta shape to the sauce.
Despite this piece’s benefits, I did run into a few hiccups. To start, it’s hard not to notice the majority-plastic construction when using this attachment. It tends to feel a bit flimsy at times, especially when feeding the dough into the hopper. I tried several different egg-based recipes, and some definitely worked better than others. The machine performed best when the dough was moderately stiff. I had the best results when using the dough recipe from the accompanying manual (which is a pretty standard fresh pasta dough). I tried using a richer, slightly eggier one and observed that a slight increase in hydration seemed to gum-up the works.
Cleaning this attachment is a bit of an endeavor, but then again, so is making fresh pasta. If you’re up for the challenge, the biggest hurdle will be dealing with the dough that inevitably gets stuck in the dies (plates) after each session. The holes that the dough is pushed through are very small, and this will lead to some build-up. For several minutes, you’ll be picking out little dough bits with the provided tool (which is similar to an all-metal pencil with a tapered, sharp point). My advice? Enjoy the pasta after you make it and let the build-up in those dies dry out before attempting to clean it. If the dough is dry, it tends to just fall out in crumbs instead of behaving like stuck-on chewing gum.
My final tips: Give the manual a once-over before starting the machine up (for example, each shape corresponds to a speed setting on the mixer, and you’ll want to make sure that you use the right one) and, when it comes time to use the swiveling wire-cutter that cuts your pasta, just commit and slice quickly. Otherwise you’ll mangle the shapes you’ve just labored over. Mangia!
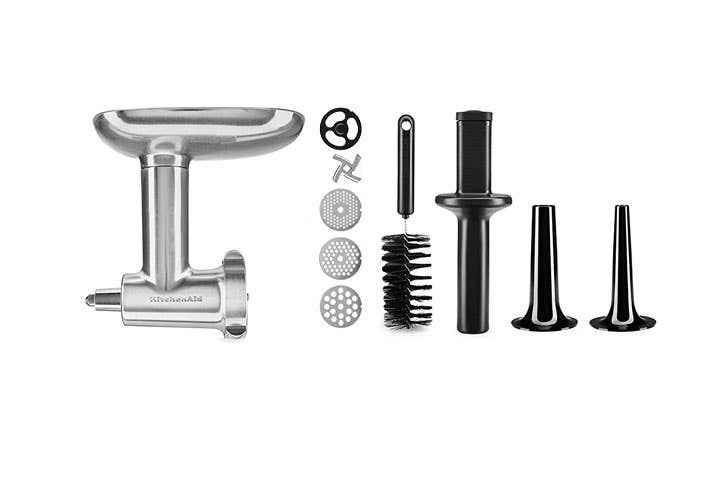
Best for the Carnivore: KitchenAid Metal Food Grinder Attachment
Best for the Carnivore
Versatility rating: Medium | Good for: Meat/sausages| Material: Stainless steel, cast aluminum
Pros
- Able to be chilled in freezer, allowing for a better grinding experience
- Durable all-metal construction
- 3 different grind sizes
- 2 sausage-stuffing attachments for the charcutier in your life
Cons
- A little noisy
- Works best when grinder pieces and meat are ice-cold
- A bit of a pain to clean
Why we chose it: It’s the obvious choice for those looking to control the quality of their ground meat and sausages.
With a little bit of recipe sleuthing, and a quick chat with your butcher, you'll be able to start easily grinding your own burger blends, meatball mixes, and sausage fillings. The attachment comes with two adapters so you can make your own stuffed sausages as well, both fresh and for curing. It's a process that can seem daunting for home cooks; sausage-making feels way more approachable with an attachment. Now you, too can transform inexpensive cuts of meat into some of the most flavorful dishes out there.
With its sharp, stainless steel internal blade and three different die-attachments (the metal plates which the chopped meat is pushed through), you’ll be able to follow the recipe for sausage filling, but also your own burgers, regardless of the kind of meat Turkey? Beef? Chicken? No problem. Maybe laab tod is more your speed? Or perhaps some a filling for some delicious dumplings?
When it comes to cleaning, the entire unit should be taken apart and washed thoroughly, piece by piece. It’s not dishwasher safe, which is disappointing considering its intended use. Be sure to scrub it thoroughly with soap and the provided brush, and sanitize it under hot water.
One more pro tip: meat grinders work best when meat is partially-frozen (or at least very cold). The same goes to the grinder itself. Just toss the entire attachment in the freezer for a little while before you’re ready to use it. Your meat of choice should be laid out in a single layer, preferably on a parchment-lined sheet tray so it doesn’t freeze into a solid mass. Just let everything chill until your ingredients are just beginning to firm up around the edges, and you should be good to grind.
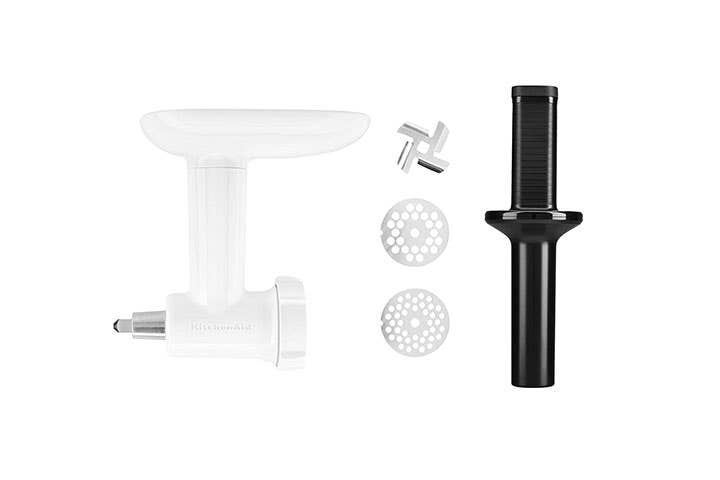
Best for the Backyard Griller: KitchenAid Attachment Food Grinder Accessory
Best for the Backyard Grille
Versatility rating: Medium | Good for: Meats, vegetables | Material: Plastic, stainless steel
Pros
- Budget-friendly
- Capable of grinding a variety of meats and vegetables
- 2 grind sizes
Cons
- Mostly-plastic construction
- Unable to be put in freezer
- Additional accessories available at extra cost
Why we chose it: It’s a cost-effective way to achieve high-quality, freshly ground meats or vegetables at home.
This grinder is very similar to the metal grinder detailed above, but it’s definitely more of a base model, without all the bells and whistles. It costs a bit less, but like anything else, that cost decrease also will minimize durability and function. This piece is perfectly acceptable for grinding chilled cubes or pork, beef, or chicken for making burgers, meatloaf, or sausage. It's also a quick and easy to way to grind vegetables like tomatoes for various uses, most commonly sauces.
Either way, I’d say it’s a fine option for a casual home cook or someone looking to make their foray into meat grinding. Personally, I wasn’t thrilled about the plastic, as meat grinders operate best when they're ice cold. Unlike the all-metal version, this one shouldn’t be frozen, as it will make the plastic brittle and more susceptible to breakage. It’s useful in that it has the option of two grind sizes, and you can purchase other add-ons for it, such as the sausage stuffer or fruit/vegetable strainer. If you’re looking for a bit of quick, home-ground meat on a budget, this attachment is for you.
How We Chose These Products
In making these rankings, I used a set of three criteria (in no particular order): ease of use/cleaning, overall utility, and the general quality of construction. As someone who has cooked professionally for over a decade, (in restaurant, bakery, and test kitchen settings), I’ve seen my fair share of KitchenAid mixers pushed to the brink. While I didn’t go that far, I did give my more than 8-year-old Artisan series a good workout, including rolling, cutting, and extruding multiple batches of fresh pasta dough. I also shredded four different cheeses, ranging from fresh mozzarella to Parmigiano Reggiano. I used the slicer to process half a dozen zucchini, and the grater to shred cabbage, carrots, and beets without issue. I also used the meat grinder attachment to process a pound each of pork shoulder and cubed beef chuck (two of the toughest cuts out there), only to use them for my very own batch of sausage. Lastly, I ground two pounds of hard whole wheat berries into a very fine flour with no problem.
Features to Keep in Mind When Shopping for KitchenAid Mixer Attachments
Performance
When using any of these attachments, keep an eye (and a hand) on the motor of your KitchenAid. You don’t want to overheat it, so if you feel it getting too warm, give it a rest for a while. Be aware of any odd sounds too! These attachments are meant for single-home use, so as long as you use them for that, they should be fine. The same goes for mixing with the standard bowl and paddle/whisk attachments: If the motor is straining to mix a dense dough, for instance, give it a rest to prevent burning out the motor.
Quantity
Again, as long as you’re not prepping restaurant-size batches of your meals every day there’s nothing to worry about. These attachments should be more than sufficient for your next family function or dinner party.
Weight
Overall, the attachments are not prohibitively heavy, though some are a bit hefty, like the solid stainless steel pasta attachments that clock in around five pounds. However, they all are significantly lighter than the mixer itself.
Operation Mode
Be sure to read your manuals for each attachment before use. Most attachments come with explanations and designated operation speeds, as well as specific care instructions for cleaning and storage.
Warranty
KitchenAid attachments come with a warranty of one year from the purchase date.
Easy to Use
All of these pieces are rather intuitive and come with easy-to-follow instructions. Just be sure to consult with your product guide before you start your next kitchen project.
Ask the Experts
Q: Will KitchenAid attachments fit all models?
Yes. All of the attachments we tested are designed to fit any KitchenAid stand mixer; one exception is the KitchenAid Mini, which is not compatible with the ice cream maker attachment.
Q: How do I attach KitchenAid mixer attachments?
Each attachment secures to the hub located on the front of the machine. Just loosen the screw-knob to remove the logo plate, insert the attachment by rotating it to ensure that it fits snugly against the hub, and retighten the screw to secure your attachment tightly.
Q: How do I remove KitchenAid mixer attachments?
Simply loosen the screw-knob on your attachment, gently pull to remove it from the machine, and replace it with the logo plate to prevent any food bits from making it inside the machine.
Q: How many attachments does the KitchenAid mixer have?
There are over a dozen base attachments. With the available add-ons, they’re capable of dozens of functions.
Q: Do I get all the attachments when I buy the KitchenAid mixer?
Sadly, no. The attachments are all sold either individually or in related sets, like the pasta rollers.
Q: How long will KitchenAid mixer attachments will last on average?
If you follow the recommended use, care, and cleaning guidelines, many of these attachments should last for many years.
Our Take
With so many attachments available, KitchenAid has made it quite easy to expand your culinary repertoire. Our favorite attachment is the 3-Piece Pasta Roller and Cutter set; it’s easy to use, well-made, and will yield a large variety of beautiful and delicious end products.
Keep Reading


Continue to Next Story
