How to Make Baguettes
Our recipe tester (and pro baker) demystifies the simple French bread recipe for home cooks.

Let me share something with you: I love bread. Baking (and then consuming) a homemade loaf is one of life’s most enjoyable simple pleasures. I admit that the process does require a bit of planning—and a few hours of downtime. And yet the results are incredibly rewarding and absolutely worth the effort. As someone who, years ago, became obsessed with baking bread and then went on to work in a professional bakery, I always advocate for home cooks to try their hand at making their own bread at home. Learning how to make a baguette is a simple and straightforward starting point.
Much like the simple roast chicken or sky-high soufflé, a perfectly executed baguette is considered one of the best marks by which to judge a master of culinary craft. French President Emmanuel Macron successfully advocated to include the slender loaves in UNESCO’s list of “Intangible Cultural Heritage”—a process that took six years to provide the necessary documentation! Amateur bakers tend to test the waters by making boules, bâtards, and pan loaves. A baguette, on the other hand, can seem a bit more intimidating. In reality, these loaves require only a handful of tools and ingredients that you likely already have in the kitchen, and are achievable for anyone with a hot oven and some time. Though your first attempt might not look exactly like those at your local bakery, learning how to make a baguette is all about practice (and enjoying the fresh-baked results).
What you need:
Tools:
- 2 large mixing bowls or a stand mixer fitted with dough hook attachment
- Digital Scale*
- Whisk
- Bench Scraper
- Cast iron skillet
- Parchment paper
- Baking Sheet
- Very sharp paring knife, razor blade, or bread lame
Ingredients:
- 1½ cups (355 g) warm (not hot!) tap water (between 105°F-115°F)
- 1½ tsp. (5 g) active dry yeast**
- 3¼ cups (462 g) all-purpose flour***
- 1¾ tsp. (5 g) kosher salt
- Neutral oil, such as canola, sunflower, or vegetable, for greasing
- 2 cups boiling water (very hot tap water can also be used)
*I highly recommend investing in a digital scale for use in any home baking project. In a professional bakery, every ingredient is measured in grams. This is for a few main reasons: Multiples of 10 are incredibly easy to scale up and down as needed, and gram measurements are more precise than pounds and ounces and more accurate than cups and tablespoons.
**Bread flour can also be used in this method, although its higher protein content will make for a “stronger” dough, with more elasticity when proofing and shaping.
***You are also welcome to substitute instant dry yeast for active dry yeast, just be aware that the fermentation time when using the instant version will be slightly faster. This will speed up fermentation and proofing times by about 15 minutes at each stage. I prefer to use active dry yeast in this recipe because a slower fermentation time results in a more flavorful final product.
BEFORE YOU BEGIN
Traditional baguettes are made using a type of preferment called a poolish. This mixture of yeast, flour, and water is mixed a few hours ahead of time, then added to the final dough to increase its “extensibility” (in other words, stretchiness, which makes shaping easier). It also lends the finished product a more complex and yeasty flavor than breads made with “straight doughs” mixed without preferments. The loaves are also often cold-proofed for several hours (and even overnight) to increase flavor depth as well. The method in this streamlined tutorial skips those steps, and instead shortens the entire process to about four hours. If you want to get a head start (and a more pronounced flavor), cover the shaped loaves with a tea towel and proof overnight in the fridge before scoring and baking them, as described below, the following morning.
STEP 1: Mix and knead the dough.
In a large bowl, whisk together the water and active dry yeast, then set aside at room temperature until slightly foamy, about 10 minutes. (If the yeast does not begin to foam at the surface, it’s probably past its prime. Discard it and grab some fresh yeast before continuing.) Add the flour, then, using a fork or your hand, stir until all the flour is absorbed and there are no dry pockets. Set aside to allow the flour to hydrate for 20 minutes.*
Lightly flour a clean work surface. Sprinkle the salt over the dough, then transfer to the surface and knead until all the salt is incorporated and the dough is elastic and mostly smooth, 9–12 minutes. (If using a stand mixer, mix the dough on medium-low speed for 4–5 minutes.) Form the dough into a ball. Lightly grease a clean, large bowl, transfer the dough into it, cover, and set aside until the dough has nearly doubled in size, about 45 minutes. Note: The warmer and more humid the environment in your kitchen, the faster your dough will rise. During the colder months, one of my favorite techniques is to ferment the dough right in my oven with the pilot light on, or near a warm radiator.
Letting the dough hydrate and rest before adding the salt is a process known as autolyse. This process allows gluten bonds to start forming gently—before you start working the dough—reducing kneading time and resulting in a more irregular, open crumb structure.
STEP 2: Stretch and fold the dough.
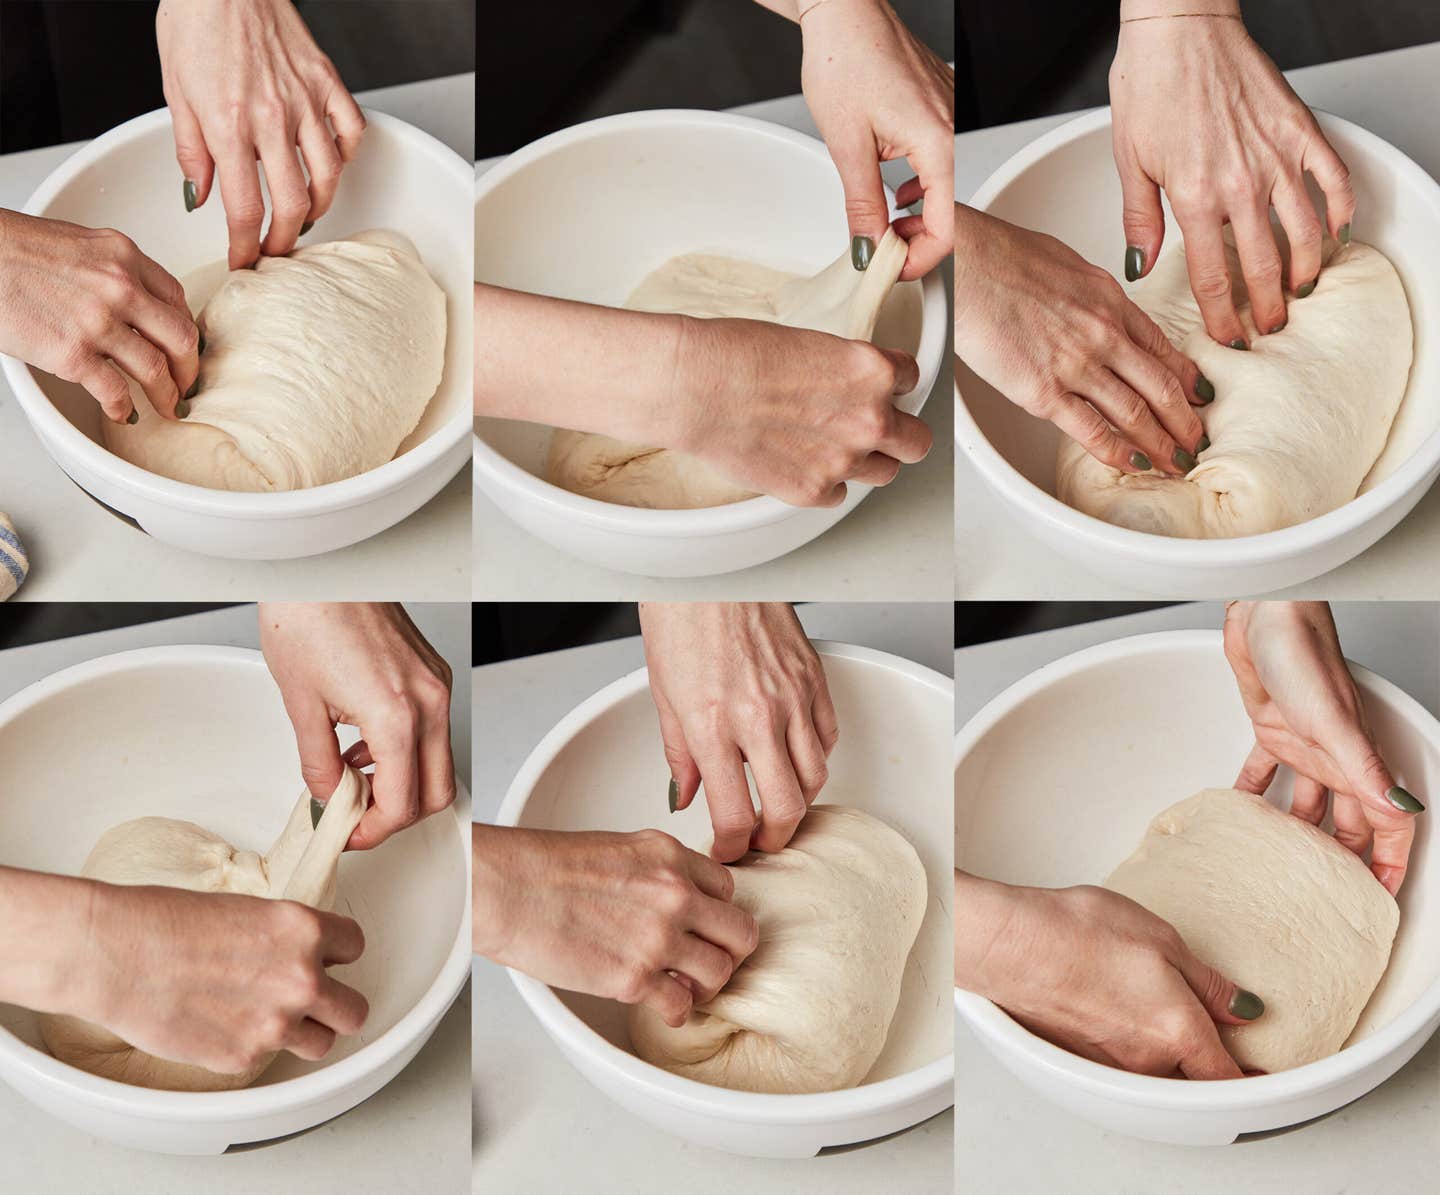

Imagine your dough ball as having four corners. Grab the top two corners (furthest from you) and lift them up and away from the sides of the bowl, folding them over towards you. Rotate the bowl 180 degrees and repeat. Now do the same with the right and left sides, respectively. Your dough should now resemble a folded envelope. Carefully remove the “envelope” from the bowl and invert it, placing it back in the bowl, seam side down. Cover the bowl with plastic wrap and return to a warm area until doubled in size again, another 45 minutes to an hour.
You may be used to seeing bread recipes that instruct you to “punch down” the dough (in other words, deflate the dough of any gasses formed during the fermentation process). I don’t like to do that here, because removing these gasses can lead to a denser loaf. Instead, this folding process helps to both redistribute the entrapped gasses and ensure a more even temperature throughout the dough.
STEP 3: Cut the dough into three pieces.
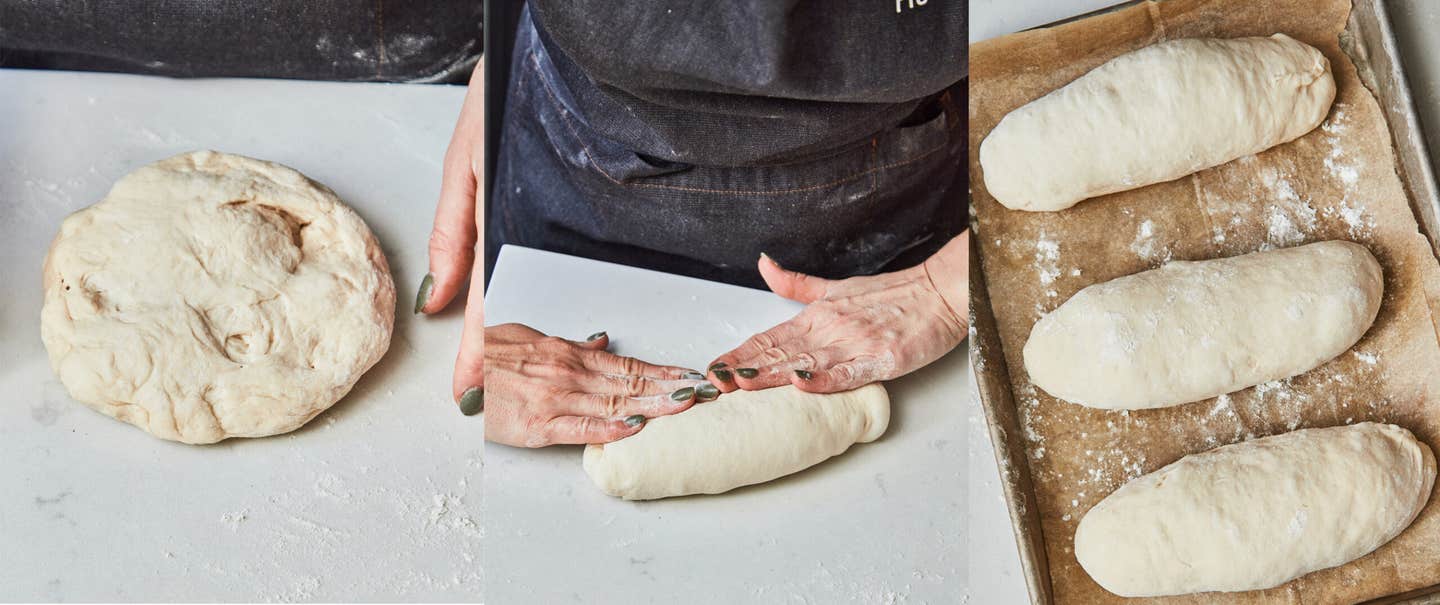

Carefully transfer the dough to your lightly floured surface, once again taking care to not deflate it excessively. Place a large cast iron pan on the floor of your oven, adjust the oven rack to the center position, and preheat to 450ºF. Using a bench scraper or sharp knife, divide the dough into three equal pieces (extra credit here if you have a kitchen scale!). Roll each piece into a tight oval (the dough should be springy if you poke it with your finger). Cover the ovals with plastic wrap or a tea towel and set aside at room temperature until the dough is “relaxed,” 15–20 minutes.
STEP 4: Shape and final proof the baguettes

Line a large baking sheet with parchment paper, dust lightly with flour, and set aside. On your lightly floured work surface, lightly press and stretch one of the dough pieces into a rectangle. Pick up the top two corners and fold them towards you, stopping halfway. Repeat with the bottom corners (away from your body this time). The dough should now resemble a tube, with a seam running along the center. Place the tube seam-side-down, and repeat the process with the other two dough pieces.
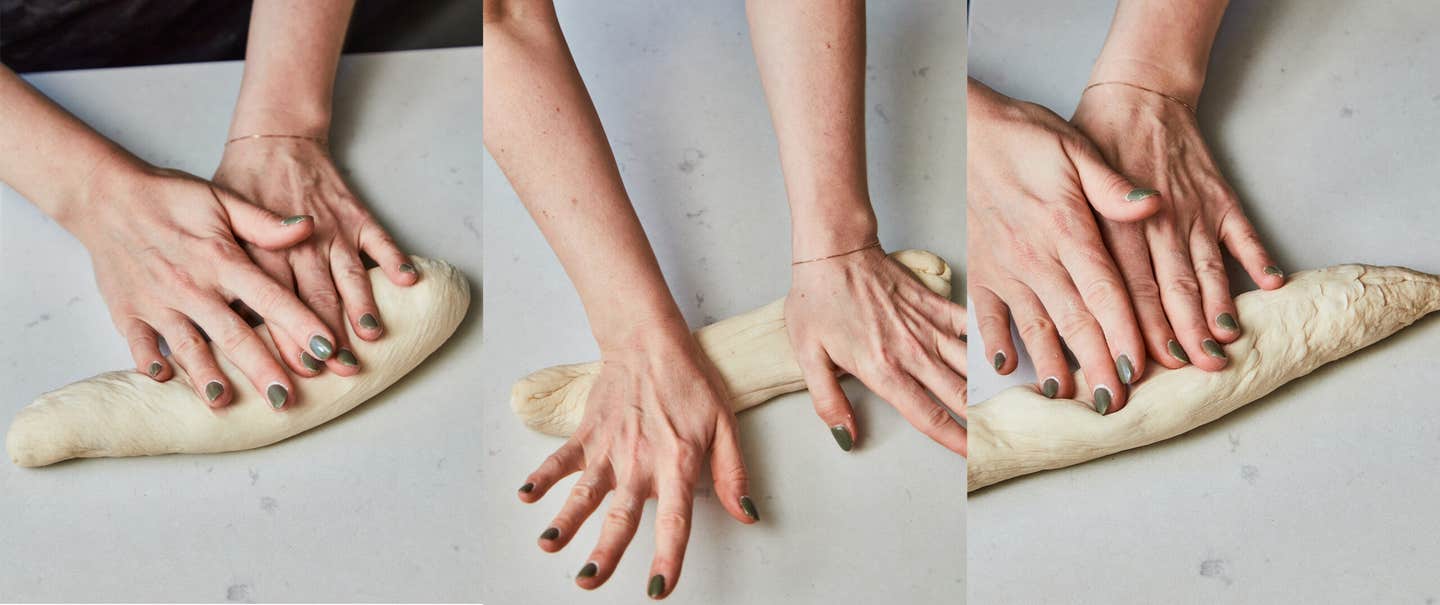
Then, go back to the first tube: Position your hands at the center, then carefully roll the log of dough back and forth, applying pressure toward either end and elongating the dough as you go. Repeat this process a couple of times until the loaf is about 16 inches long, and tapered at the ends. Continue with the other two pieces of dough, then place the baguettes seam-side-down on the lined baking sheet. Cover with a sheet of plastic wrap or very slightly damp tea towel and set aside at room temperature until the loaves are slightly puffed up and the dough bounces back slightly when poked gently with your finger, 20–30 minutes.
STEP 5: Score and bake the baguettes.
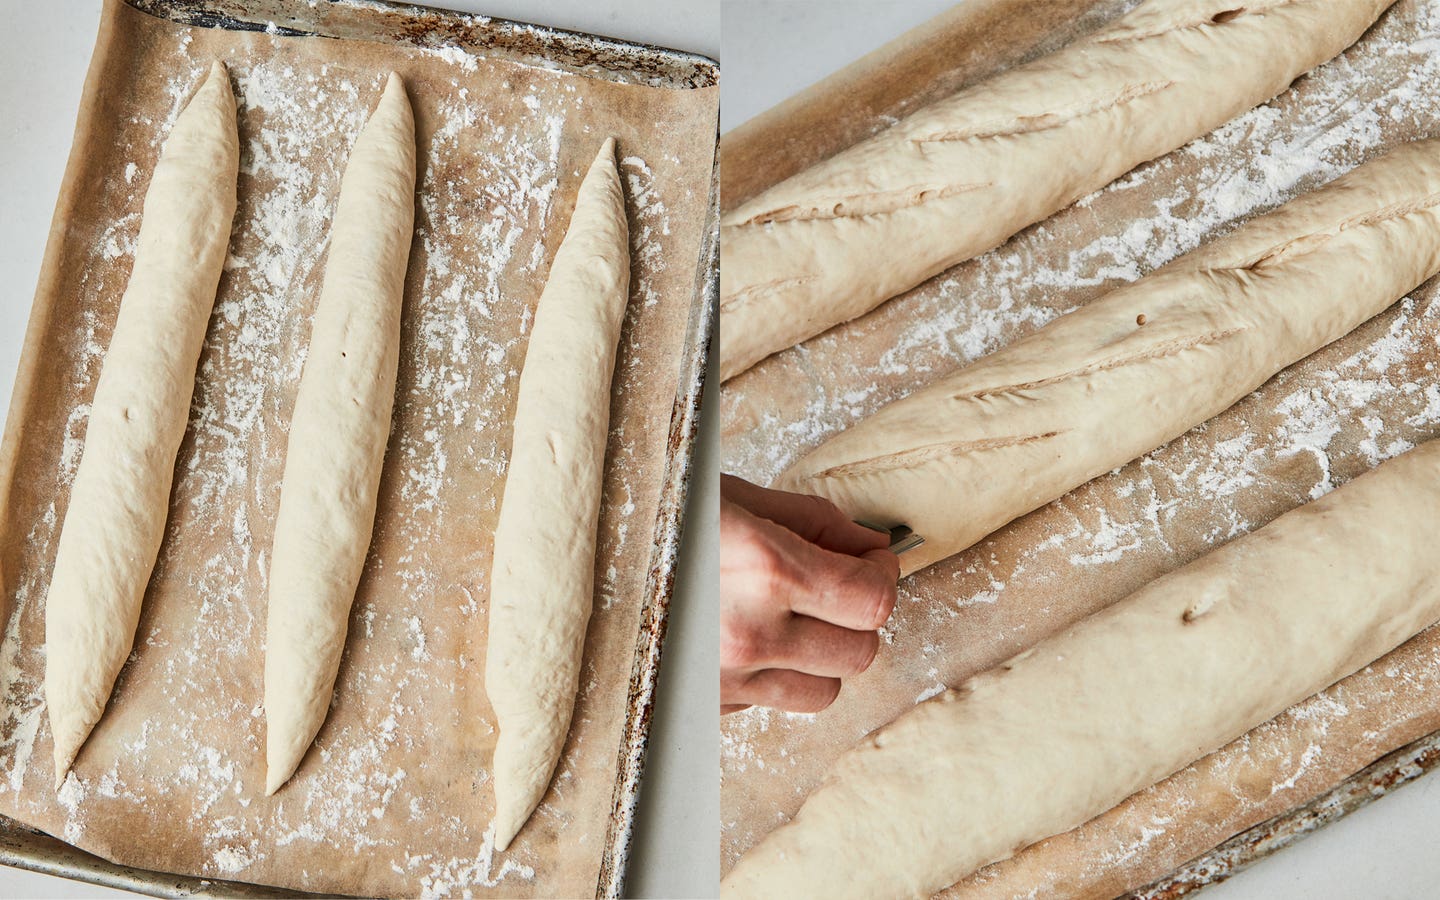

After scoring your baguettes, you’ll want to move as quickly as possible when loading them into the oven, so be sure that it’s fully preheated before you proceed.
Using a sharp knife or razor blade held at a 30 degree angle, cut four evenly spaced slashes along the top surface of each baguette. If you have a spray bottle on hand, give the loaves a light spritz of water, then, quickly and carefully transfer the baking sheet to the oven, pour at least 2 cups of boiling water into the hot cast iron skillet, and shut the oven door. Bake the loaves until golden brown, 25–30 minutes. Remove the baguettes from the oven and do your best to let them cool before diving in.
A steamy oven is crucial for achieving a good rise and a thin and crispy crust. The steam created from the initial heat of the skillet will fill the oven, then condense and settle over the surface of the baking loaves. That moisture keeps the outside of the dough hydrated and springy, allowing for more “oven spring” as the loaves bake. Without steam, the outer layer of bread “crisps up” before the internal temperature has risen enough to cause the gasses to expand, and your bread can end up dense, hard, and misshapen.
Tip: Most home ovens have vents that let out steam, usually above and behind the cooktop. In order to retain as much steam as possible, I recommend using a rolled up kitchen towel to block these vents while you bake—every little bit of steam helps!
How to store leftover baguettes
Baguettes tend to go stale within a day or two, and leftovers are best kept at room temperature in a bread box or a waxed canvas or plastic bag. Fully cooled bread can also be wrapped tightly in plastic and stored in the freezer for several weeks. And should you find yourself with some stale leftovers, don’t throw them out. I like to cube stale bread, toast in a 375°F oven until golden-brown, then toss them in some olive oil and savory seasonings to make croutons. Or, simply pop the cubes in the food processor and blitz them down into homemade breadcrumbs.
Keep Reading


Continue to Next Story
